We do not accept Medicaid or Medi-Cal

Natural-Looking White Fillings in Los Angeles
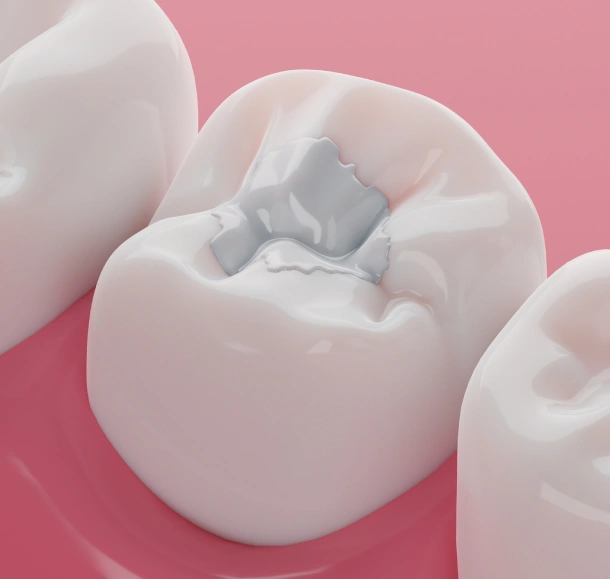
Cavities happen, even to people who brush and floss regularly. The good news is that treating them doesn't have to mean a mouth full of metal. At Amigos Dental, we use tooth-colored composite fillings that blend seamlessly with your natural teeth, so your smile looks the same after treatment as it did before.
Walk in any Friday, Saturday, or Sunday and in most cases, we can assess and fill a cavity the same day, no lengthy wait for a future appointment.
White Fillings Vs. Silver (Amalgam) Fillings
White fillings:
- Match the natural color of your tooth
- Bond directly to tooth structure — less drilling required
- Suitable for visible front teeth and back molars
- Free of mercury
- Preferred by most patients today
Silver amalgam fillings:
- Match the natural color of your tooth
- Bond directly to tooth structure — less drilling required
- Suitable for visible front teeth and back molars
- Free of mercury
- Preferred by most patients today
At Amigos Dental for Kids & Adults, we use white composite fillings as our standard, giving you a result that's both functional and natural-looking.
What Happens During a White Filling Appointment
Getting a cavity filled at Amigos Dental for Kids & Adults is straightforward and typically completed in a single visit. Here's what the process looks like:
Examination & X-Ray
We'll examine the affected tooth and take an X-ray if needed to assess the full extent of the cavity and confirm the right treatment approach.
Numbing the Area
We apply a topical numbing gel before the local anesthetic so the injection itself is as comfortable as possible. Once the area is fully numb you won't feel any pain — just occasional pressure.
Removing the Decay
The decayed portion of the tooth is carefully removed. With composite fillings, we preserve more of your natural tooth structure than with traditional amalgam fillings.
Placing the Filling
The composite resin is applied in layers, with each layer hardened using a special curing light. The filling is then shaped and polished to match the contour of your tooth and feel natural when you bite.
Final Check
We'll check your bite to make sure everything feels right and make any fine adjustments needed. You'll leave with a fully restored tooth that looks and functions naturally.
Most single-tooth fillings take 30–60 minutes. Multiple fillings in the same visit may take longer.
Replacing Old Silver Fillings With White Composite Fillings
If you have older silver amalgam fillings that are worn, cracked, or simply something you'd like replaced for cosmetic reasons, we can swap them out for natural-looking white composite fillings.
Reasons patients choose to replace silver fillings:
- The old filling is cracked, worn, or failing
- Decay has developed around or beneath the existing filling
- Sensitivity or pain around an old filling
- Cosmetic preference — wanting a more natural appearance
- Concerns about the appearance of metal fillings in visible teeth
We'll assess the condition of your existing fillings and let you know whether replacement is medically recommended or purely elective, so you can make the right decision for your situation.
White Fillings for Children in Los Angeles
Cavities are one of the most common childhood health conditions, but they're also very treatable. We perform white composite fillings on children of all ages in a gentle, unhurried environment designed to keep kids calm and comfortable.
Treating cavities in baby teeth matters. Even though they'll eventually fall out, untreated decay in baby teeth can cause pain, infection, and can affect the development of the permanent teeth coming in beneath them.
We explain everything to children in simple, friendly language and never use words that might cause anxiety. Most kids handle fillings better than their parents expect and leave feeling proud of how well they did.
Signs You Might Need a Filling
Cavities don't always announce themselves with obvious pain — especially in their early stages. Watch for these signs and come in if you notice any of them:
- Toothache or spontaneous tooth pain with no obvious cause
- Sensitivity to hot, cold, or sweet foods and drinks
- Visible holes, pits, or dark spots on a tooth
- Pain when biting down
- A rough or jagged edge you can feel with your tongue
- A filling that feels loose, cracked, or different than usual
Even with no symptoms at all, regular dental exams catch cavities early — before they become larger, more painful, and more expensive to treat.
Walk In Any Weekend for White Fillings
Serving patients across Los Angeles, including Westlake, Echo Park, Koreatown, Silver Lake, Downtown LA, and surrounding neighborhoods.
Hours:
Monday - Tuesday: Closed
Wednesday - Thursday: By Appointment Only
Friday - Sunday: 11:00 am – 07:00 pm
Monday - Tuesday: Closed
Wednesday - Thursday: By Appointment Only
Friday - Sunday: 11:00 am – 07:00 pm
Walk-ins welcome. Emergency calls accepted 24/7.