We do not accept Medicaid or Medi-Cal

The Smart Middle Ground Between a Filling and a Crown
When a tooth has too much damage for a simple filling but not enough to justify a full crown, an inlay or onlay is often the ideal solution. These custom-made restorations fit precisely into or over the damaged portion of a tooth, preserving more of your natural tooth structure than a crown while providing far more durability and coverage than a standard filling.
At Amigos Dental for Kids & Adults, we offer inlay and onlay consultations with no appointment needed. Walk in any Friday, Saturday, or Sunday and our Los Angeles team will assess your tooth and recommend the most conservative, effective treatment for your situation.
What Are Dental Inlays and Onlays?
Inlays and onlays are both indirect restorations, meaning they are custom-fabricated outside the mouth at a dental lab and then bonded to the tooth at a second appointment. They are sometimes called partial crowns because they restore a portion of the tooth rather than covering it entirely.
Dental Inlay
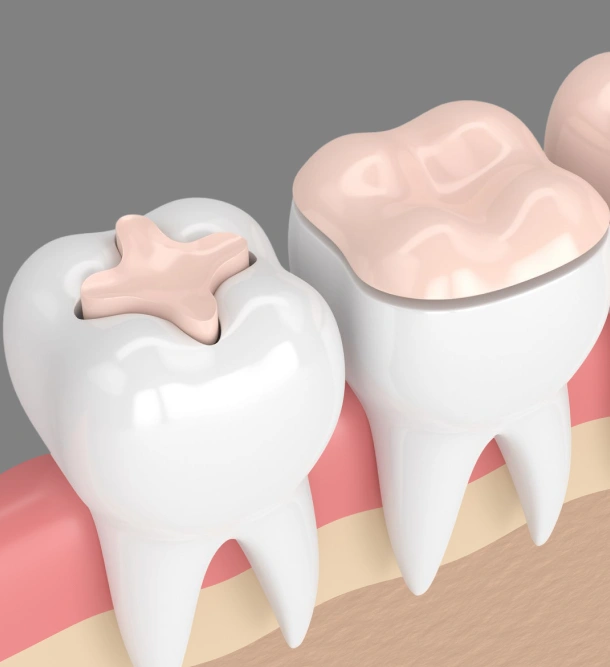
An inlay fits within the cusps, the raised points of a back tooth. Think of it as a precisely fitted puzzle piece that fills the central chewing surface of the tooth. Inlays are used when the damage or decay is contained to the inner portion of the tooth and the surrounding cusps are intact and healthy.
Dental Onlay
An onlay extends beyond the cusps to cover one or more of the outer chewing surfaces of the tooth. It is used when the damage is more extensive, involving one or more cusps, but not so severe that the entire tooth needs to be covered with a full crown. Onlays are sometimes referred to as partial crowns for this reason.
What Happens During an Inlay or Onlay Procedure at Amigos Dental for Kids & Adults
Getting an inlay or onlay typically involves two visits. The process is similar to that of a crown but more conservative in terms of how much natural tooth structure is removed.
Examination & X-Ray
We examine the tooth thoroughly and take X-rays to assess the full extent of damage and confirm that an inlay or onlay is the appropriate restoration.
Removing Decay and Preparing the Tooth
Any decay is removed and the tooth is carefully shaped to receive the inlay or onlay. With these restorations only the damaged portion of the tooth is prepared — healthy surrounding structure is left completely intact.
Impressions
A precise impression of the prepared tooth is taken and sent to a dental lab where your custom inlay or onlay is fabricated to fit exactly. We also record the shade of your surrounding teeth if a tooth-colored material is being used.
Temporary Restoration
A temporary filling or restoration is placed over the prepared tooth to protect it while the lab fabricates your permanent piece — typically one to two weeks.
When your inlay or onlay is ready
we remove the temporary restoration and try in the permanent piece to check the fit, bite, and appearance. Once everything is confirmed we bond it permanently to the tooth using a strong dental adhesive and cure it in place.
Final result
The final result is a seamless restoration that is indistinguishable from the surrounding tooth and significantly stronger than a direct filling over a large area.
Most patients adapt to their inlay or onlay immediately, it should feel completely natural within a day or two.